Saturday, July 25, 2015

Fold Forming Organic Copper Leaves


Here are some photos of the various steps of working on some fold formed copper leaves.  I started with 24 gauge copper sheet that I milled to thin.  It's possible to start thinner at a 26 to 28 gauge.  It just depends on how much texturizing or hammering you will do.  The metal will thin out as it's worked or milled.

There are so many ways to cut and shape pieces like this.  I wanted my pieces to have waves like dry leaves.

It's a process to do this because you anneal the metal, work it a bit, anneal and work some more.  This was a super fun way to add a lot of dimension.


Thursday, July 16, 2015

Copper and Stone Pendants Cold Connection


The top pendant was a simple coiled piece of copper I had hammered accents on.  I decided to get creative by adding a round bead to the center.  I threaded the stone with wire, wrapped it, coiled the ends and tucked it under.  I did something similar with the bale.  This seemed to add a lot of interest to the metal by connecting various pieces of metal without heat.

The second pendant also features labradorite that has been wrapped into a bale.  I used the same bead plus some Czech glass beads at the bottom.

The bottom pendant is copper and I had milled a laurel leaf onto it.  I bent the milled stem section of the leaf back to form a bale.  I made a wire wrapped bead for an accent and used a nice fluorite for the dangle.  These all started out as simple ideas and the little accents added layers of interest.


Bracelets and More in the Works

I've milled my favorite leaves onto copper for some bracelets that are in the works.  The other pieces were milled, cut and annealed for various projects.  The smaller pieces are for a special project.  I can never be without a Sharpie and they are on the bench, tucked in my pockets, in my pack, tool box and so on.  Pictures to follow!


Thursday, June 4, 2015

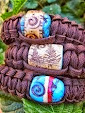
Turquoise in Polymer Clay with Micro Paracord Bracelets

I taught a workshop in Phoenix a couple of weeks ago and we made faux turquoise of polymer clay.  We made a lot of other things as well, but the turquoise is just so fun!

The polymer clay is put in a food processor, then pressed back together.  *Just a reminder that any tools used for polymer clay will then be dedicated for polymer clay. 

The results will vary on how finely ground the clay is and how you roll or press it back together.  There are so many things you can do with this such as beads, slab pieces and accent strips.

The pieces are cured, stained, wet sanded and buffed on a jewelers wheel.  There is a bit of labor and several steps involved, but the results are really nice.  Many people think this is real turquoise, then I tell them it's polymer clay.

I used a micro paracord for the bracelets with black clips in the back.  This is more of a herringbone type weave and it takes a little longer to tie vs. the basic macrame or cobra knot.  This makes a really fun and rugged piece of wearable art.  The bracelet can be untied and the cordage may be used for various utility needs.  This may also be called a survival style bracelet which is really popular with the hikers and campers!

Southwestern Pot Beads in Polymer Clay


I recently made a series of my Southwestern Pot Beads in polymer clay.  These are a similar style to the beads I had published in "1000 Beads" by Lark Books last year.

I mixed all the colors, created the stripe accents, sculpted, used my own custom stamps for the tops and added all the accent lines by hand.  These were cured, stained, sanded and buffed to polish.

I made bracelets with these and they were delivered to a gallery shop in Phoenix.

Sunday, April 26, 2015

Nature Photography In The Woods Citrine Ring

Some of the things I make are a bit more rustic, so it's fun to photograph them out in nature.  Sometimes Mother Nature surprises you and the weather can change fast.  My destination was over 7,000 feet, the wind whipped up and the temperature cooled as it plunged to 47.

I always have some sort of bag with supplies, extra clothing, food and water.  Hats are super handy because they not only shade you from the sun, but they keep your head warm and help block the wind.  Not to mention food, water and other supplies that are a good idea to bring with while going on an adventure.

I had multi-layers of shirts and sweaters and also blankets and beach towels.  One of the beach towels came in handy for a wind break.

I hiked over to some favorite boulders to click some photos with my i-Phone.  I have a really nice full size camera, but I use the camera phone on quick trips like this.

Items photographed in full shade really look the best.  Since it was overcast, it was a little challenging to find full shade.  I've used the same boulders before, so I had a feeling the location and time of day would work fine.

Certain background colors work well with certain items.  Some background colors enhance and some do not.  Try to photograph your item on various backgrounds.  Copper on a rust color might not always work and sometimes granite will look better.

I will take several photos of a scene and move the camera angle slightly each time.  I will also tend to bring the camera back from the piece as well.  This will change the focus each time.

There is a lot of texture to the wire wrapping and even the underlying boulder.  You will notice each photo will look a little different.  Some of the photos of this ring had a clear shot of the wrapped shank, cord or boulder.  I was looking for an overall focus on the item.  There are other times I do want one area in focus and another area more blown out of focus.  Just take plenty of photos! 

I've many times set up an area to photograph items with props, clicked photos, taken down my area, gone inside to review photos and have discovered, I've somehow missed my mark.  The best thing I've learned is to vary the camera angle and move back a bit.

I photographed the ring on various sides and angles.  There were two boulders and a bunch of pine needles between them.  I used those to prop up the ring.  I also found an old sun dried piece of wood to use as a mandrel.  It all seemed to work.  Just look around and toss some found objects into the photos while out in nature.

It's possible to take really good photos of your work in any setting.  It just takes practice and you don't need an expensive amount of equipment.  A camera phone may just do the trick! 


Friday, April 10, 2015

Scroll Cross Revision

I decided to add a large, deep purple amethyst briolette to the bottom of the pendant.  I also made the necklace to be adjustable to lay just right with various collars.  It's now sitting in a display case on a black velvet form, waiting for someone to take it home.

About Me

My photo
I enjoy silversmithing, making jewelry, beads and working with paracord. I sculpt in polymer clay and desert themes are my favorite. I'm always looking for ways to incorporate the beauty of nature into my work. My work has been published in a large book called "1000 Beads," Lark Jewelry and Beading, 2014. I have sold beads through the Glendale Bead Museum Shop, a gallery in Tucson and www.wearartbyjulie.etsy.com. I'm an artist currently showing my jewelry at the Shemer Art Center in Phoenix, AZ.