Tuesday, November 25, 2014

Clovers and Oak Leaf Earrings in Sterling

The clover earrings to the left have tsavorites at the top which are green garnets.  I thought those went well with the Irish vibe!  Maybe they will make it to Ireland like the pendant I sold a while back.  

The ones in the middle were slightly larger and both pairs had clover impressions on the back side.  These have been re-homed.  I'll be taking the pair on the right to the store this week.  I love making these earrings!

Sunday, November 9, 2014

Ornaments for The Store

Here are some ornaments I made for the trees at the co-op.  I believe they will be hanging on the trees by tomorrow afternoon.  I'll be making more of these and some out of polymer clay as well.

I used two different sizes of heavier copper wire for these.  I then began the process of bending, milling, annealing, bending, milling and annealing.  A process of working the metal and then hammering accent designs on them.  All the wire has added patina to darken it.

I used various crystals, amethyst, tiger eye and Czech glass beads.  These might be too fun to put away after Christmas!  I can see someone hanging them anywhere the light will catch the crystals.  'Tis the season...  Well, almost!

Monday, November 3, 2014

Half Ounce Fine Silver Coin with Oak Leaf and Paracord Bracelet


I usually make these with the rectangular ingots, but I have been wanting to try making one with a half ounce fine silver coin.  After milling, the coin stretches into a bit of an oval and most of the mint details and words seem to be pressed away.  You can still see some slight imprints from the mint on the coin.  What really lets you know it's a real coin would be the ridges that are all the way around the edges.

I like to mill the leaves on both the front and the back so there is something nice to look at whether you are wearing it or you are looking over at it on a table.  I sawed out the holes for the paracord, added patina, removed some of it and curved the metal.

The 550 black paracord double cobra knots were done on either side and anchored to a quality curved black plastic clip made in New York.

The leaves for this project were picked up in the Rim Country of Arizona also known as the Tonto or Mogollon Rim.

Sunday, October 26, 2014

Arrowhead and Pine Tree Pendants with Riveted Bales

I've been working through some different ideas recently.  I've wanted to make larger bales and rivet them to the pendants.  I'm continuing to experiment with different sizes of bales and they usually start out with a sketch, then I cut them out and fold them to get a good estimate of how they will look.  I then use the cut out as a template, draw around it directly onto my metal with a Sharpie and saw away.

The Sharpies are great and I have them in fine and thicker tips in various colors.  I have them everywhere...  On my table, in my bag, with my tools, tool box, on the counter... all over the place.  A Sharpie will create a block for your patina to take hold, so make sure you sand it off or use nail polish remover to get it off.  If you don't you will have black patina and then notice some red or an off color in your recessed areas.  Just make sure to get the pen marks off the metal before you patina.

The handmade bales add some more interest to the pendants.  A jump ring or an oval jump ring are very basic.  I also milled the same texture to the bale metal as I used for the pendant backings.

You drill three holes and hope that somehow it will all match up with some adjusting and you then thread the right size silver wire through that matches the size of the drill bit used.  The fit for the wire to get through the metal needs to be very snug so the metal does not start to bend when hammering.  Hey, it still seemed to bend a bit, but it can be pushed back with some of the plastic type wire straightening pliers.  If you don't have those, it's always safe to use tools with a little masking tape wrapped around them so you won't scratch the metal.  Anyway,  hammer back and forth, flipping your piece back and forth and work at it slowly.

I also place a piece of index or heavy card stock under my metal to ensure I'm not scratching the reverse side of the pendant.  It's a trick to hang the bale off the edge of your little anvil because it's no longer flat.  Hanging it over the edge will make sure the large bale isn't an issue while your pendant lays flat.

I hammered the arrowhead to give it the look of flintknaping.  There are various types of hammers that will give your pieces added texture.  You just have to find the right one that works for your piece.

I added the patina and then removed it as usual.  I didn't want to leave a dark area in the center of the tree and removed some of it.  I then thought it was too light...  I then decided to add more patina with a Q-tip to the recessed area and it started to turn a blue/green.  Nice, I'll take it!  You never know what kinds of colors will appear.  I do know that if you have what I call the peacock colors and you add too much patina, it can turn brownish or just dark.  I wanted more green, but I stopped right there...  You have to be able to say this is good enough and stop.  It's not easy, but many times with the jewelry, to much of a good thing, is overdone and you can loose your look.  Let go of the perfection and say, "This will work!"

I really like the bales on these and they just look a bit more handmade.  The larger bale can easily accommodate a much heavier chain, larger clasps and thick rubber or leather cords as well.


In the Works Friday

I was going through some scrap silver for casting on Friday and found a piece where I had sawed out a pine tree.  I decided to then saw around that to create a silhouette.  I sweat soldered the piece down to another piece of metal.  As you can see the piece on the fire brick didn't look like much at that point. 

Let's see what else...  I have an arrowhead pendant in progress here, some bales I sawed out for the pendants, earrings pieces with clovers and another larger milled piece that will be a pendant.  I think I will drill some holes in that metal and build a frame around it.  Simple and it will be all about the leaf impression on that one.


Tuesday, October 21, 2014

Riveted Cross and Bale Sample in Copper

This is something I've wanted to make for a while.  I really like to rivet copper and do what is called a cold connection as you can see I've done for this pendant and bale.  The copper sheet for the pendant back and the bale were both milled at different times.  This is what I consider a sample to experiment with gauges of metal, size and spacing.

There are no instructions for these items, just what I see in my mind.  Sometimes I draw right on the copper with a fine tip Sharpie and saw out the piece.  Sometimes I draw onto a thick index card and experiment with pattern peices like I did with the bale.  The backing piece of copper was with my little pile of metal (yes, pile of metal that could have very easily made it's way to the recycling bin at the jewelry studio) and I figured how too make good use of it.  The bale piece was also a little piece of copper that had been bouncing around with my miscellaneous metal as well.

The metal has texture on both sides and the back of the pendant looks pretty much the same as far as the leaf patterns.  The rivets for the cross and bale can be seen from the back as well.  The leaf texture was a bit light on the bale and I hammer stamped some texture onto it just like I used on the cross.  You can take one detail from one area and add it to another area.  This gives a little bit of this here and a little bit of that there, to create a cohesive look.  Just little simple things you can add to tie the look together.  I also added some miscellaneous lines with a graver.

I will work a bit more on this design and would like to increase the size of the base metal.  I would like to have a little more space at the top, but I was using essentially a piece of my scrap copper, so I was limited on size.  I like the size of the bale because it can accommodate a thicker round leather cord or heavy chain.  I may just saw a piece a bit more narrow the next time.  I also have some other ideas for the connections that may involve some stones and beads.

I like to work on samples in copper before I make larger pieces in sterling silver.  I see some silver and gemstones with the next one like this.  To be honest, every time I make something, I learn something.  You go through the process and then ask yourself, what can I do differently?  Well, you pretty much know what works and what doesn't.  I got this one together just fine, but I've learned a bit more and the next one will be improved.  Always room to grow and learn!

Sunday, October 5, 2014

Quilted Heart

This pendant is made of fine silver, sterling silver and various gauges of silver wire.  I actually used one small fine silver ingot and milled it, annealed it, milled it more, then cut it into three pieces.  I have two other pendants in the works that will have fine silver backings.

I hand engraved and hammer stamped the designs on the backing piece as well as the heart.  For some reason, I decided to do a cold connection here and drilled holes through both pieces of metal and riveted.  I added accents to the rivet tops to match the images on the heart and backing.

The wire wrapping takes hours and hours and I actually made this one less complicated than some of my other past pendants.  The sterling beads were added as accents and they give the piece that little bit of something extra.

The chain is from the Czech Republic, the fine silver is from a U.S. mint, the silver sheet has been in my tool box for over 15 years, the wire was picked up in Phoenix and the yummy faceted rhodolite garnets were shipped in from Bangkok.  

Making jewelry is a little bit like making a quilt.  Always looking for something special here and something special there.  All the little pieces, that at the right time, come to be... little pieces created by me.


Sunday, September 28, 2014

Do You Have Any Money Clips?


Asked the man and I replied, "No, but I'll make some."  He then handed me an old copper money clip that had been used for so long that it finally cracked in half.  I picked up my pen and was going to jot down some measurements and he told me to hang onto it until I made the other one.

I closely examined the little money clip and could see where something was soldered onto it and that was long gone.  The crack was right at the fold on the top.  The metal was no doubt work hardened by adding money and taking it out of the clip over the years.  I believe the metal cracked as a result of that.

I milled these just like most of my pieces and also have some texture from the leaves on the inside as well.  The first photo shows the front side and the second photo shows the reverse side.  This was such a great idea for a useful, functional item.  These have already been shipped and I have a few more to be finished.

Monday, September 22, 2014

Big Sky

Big clouds too over cool northern Arizona!

Saturday, September 20, 2014

Room with a View...


And the best room with a view..., is a tent!


Saturday, September 13, 2014

Torch Fired Enamels


I've been experimenting with forch fired enamels recently and here are some photos.  The top photo shows some finished pieces.  The larger piece was actually overfired on the back side and I then flipped it and added a layer of the turquoise color over it.  There is a bit of a hill and the very top sugar fired which means it's a bit rough.  Different looks would be the full firing and that is slick like glass (ha, ha), orange peel and then the sugar coat look.  These represent different stages of the enamel actually melting.

The other two pieces have about two to three layers on each side.  This is a bit time consuming because you are back and forth adding more enamel and firing again several times.   I used a brass stencil and sifted a translucent lighter brown color over the turquoise.  The lines are not clearly defined because the enamel looks like powder, so the edges are fuzzy.  I really like how these look like decorative tiles.  I love craftsman architecture and old bungalows, so I can see making future pieces with some mellow ambers, golds, browns and greens.

I had the idea to take a fresh water pearl and thread it on a piece of sterling silver wire.  I then anchored it through the pendant, wrapped the wire to form a bale, wrapped the pearl itself again and also coil wrapped the bale.  This adds more interest to a very simple piece of metal by adding an artistic bale.  Instead of a jump ring, I have a pearl that looks like it's floating over the enamel piece.

The round piece was being fired by my friend and she has been making earrings.  She has a smaller holder over a metal screen in this photo.  This can take a bit longer to fire because the heavy screen absorbs so much heat.  We then switched over to using the three pointed holders and not using the screen.  The powdered enamels fire/fuse at 1500 degrees, so you can imagine the amount of care and consideration when working on these projects.

The bottom photo shows the enamel on my copper piece before firing.  After firing, I use long tongs to move the copper piece off and also move the metal stand as well.  We rest the fired pieces on a large piece of steel and that absorbs the heat more quickly.  I moved a piece after it had been cooling quite a while and decided to rinse it off with some water.  I then noticed some internal fractures in the glass probably due to cooling too fast.  I reheated that piece to take care of the cracks.  This has been interesting!  I'll be making some pendants and earrings soon with the enameled pieces.


Sunday, August 24, 2014

Woven Silver Wire

Some more woven metal here in the shape of a six petal floral form and a five point smaller post earring.  The earring center looks a bit more like a tiny rose, but I'll take it!  I will make the other one later, so I'll have two to wear.

This metalwork is woven and has visual texture and is also tactile.  It's so fun and different.  It was a challenge to size this idea down.  The petals were very tiny to hold while weaving and pulling the wire.  These look large for studs, but they are very wearable.  

In a way, they remind me of the many pairs of my grandmothers earrings I've studied over the years.  Large clip earrings were so popular for so long and I own loads of them.  They were large, pretty and so dressy.  I think it's time for a comeback, but you know I'll be wearing these with my denim coat.

Friday, August 22, 2014

All Metal... 925


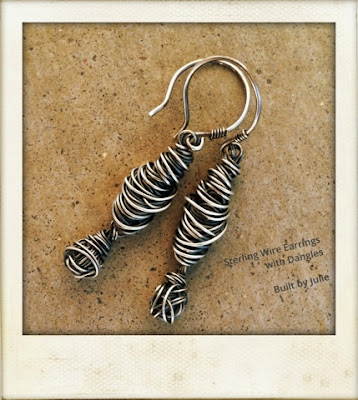
Wrapped, woven, hammered, coiled...  Just some words to describe these earrings and wires.  Someone presented the "all metal" idea, so I made the metal spheres vs. stone dangles.  I made the ear wires and also wrapped the tiny coils around those.  I've used quite a bit of sterling wire in three different gauges for this pair.  Patina added, patina removed...  You know the drill!  A simple thought and easy design, but all hand built and pure fun.

Wednesday, August 6, 2014

Space Age Field Trip - Tools of the Trade


Oh, all those leaves and nature photos, but sometimes... you gotta dig right into the grit.  It was time to visit my fave little boutique for a few things.  No, I wasn't at the craft or scrapbooking store, I was at Space Age Auto Paint in Mesa, AZ.

The auto paint super center has a certain vibe all its own.  Of course you walk in and your olfactory sense goes shabang!!!  Ah yes, the smell of all that mixing paint, then there is the little squeak coming from the mixer as well.  Lots of cool things to look at literally hanging all over the place.

It was kind of interesting because the crowd in there, as always was very diverse.  There were men, women, young folks, old folks, folks looking at supplies and a little crowd waiting for their custom blended paint.  Just makes you wonder where everyone is going back to and what kind of cool projects will be coated with the paint.  One of the guys in the shop told me that someone had come in for some fiberglass supplies and then came back in with his finished projects.  He had shaped and made the twisted horns like Ms. Jolie wore in Maleficent for his daughters.  He brought them into the shop wearing them one day.  So, I guess I'm not the only person in there working on something else other than an old pony car.

Me..., well I was there for sandpaper...  Factoid:  The hardware stores and big box shops have rather lean selections of sand paper.  Yah, they have the lower grits like 400, 300, 80 and stuff like that, but I use the high grit stuff.  The wet/dry paper they have at Space Age is great and I can get it all the way up to 2000 grit. 

I use this sand paper on my metal jewelry, polymer clay beads and pieces.  You can do the work, but you have to finish it.  "If you don't take the time to finish it well..., well then you haven't finished it at all!"  Yes, that's a Julie quote... You can quote me on that!


Saturday, August 2, 2014

Home on the Range


These are some images from beautiful northern Arizona I had taken earlier. The buffalo at this location were a total surprise.  It was so amazing to walk up and have seen these beautiful animals that are a true symbol of the American West.

The clouds were beautiful, the sky was so amazing and the yellow flowers seemed to go for miles and miles.  Yes, I could see for miles and miles!

I did brighten these photos just a tiny bit to give them a little more pop!


Wednesday, July 30, 2014

Sun Sets on the Day...


The day comes to a close, the sun sets, the sweet light reflects off the lake and now the gift is, the beauty of the night.

Woven Sterling Pendant with Pearl and Topaz


The foundation of the weave is a larger gauge of sterling wire.  I've used two additional gauges of sterling wire for the main construction.

This can be considered a quatrefoil, clover, cross or floral shape.  The woven look is very organic and I like to imagine the fresh water pearl is the center of a flower with little stamen tips swirling around.  That's what I was trying to accomplish with the weave around the center.

I've made these with or without dangles or stones.  For this pendant, I've added a sky blue topaz brio.  I favor labradorite, amethyst and peridot, but this blue is sweet.

Photographed on my favorite little stack of well worn cement steps somewhere out there.

Monday, July 28, 2014

What in the World is in the Works...?


Copper, leaves and clovers for the wrist.  Cuffs and components in the works and you'll see them finished soon!

Sterling Leaf and Labradorite Earrings

I'm always thinking I need to make more earrings.  These have tiny leaves milled on the silver and I've added a nice patina.  I carefully wrapped the smooth pear shaped labradorite stones and also wrapped some wire at the tops of these as well.  I hand shaped the ear wires and even coiled the accent wire at the base.  These would look fantastic dressed up or paired with a favorite t-shirt and denim jacket.

Sunday, July 13, 2014

Out in Nature Photography


I guess there's nature photography where you're clicking away at all the amazing things you see out there and then there is taking photos out in nature.  What's the difference?  The out in nature photography is where I actually take the items I make "out in nature" and click away.

I saw some pretty cool things along the way like little Alvin, a big bald eagle way up in a tree, the perfect boulder for my copper rattlesnake skin paracord bracelet and more scenery.  I love the copper color of the boulder and it enhanced the center piece on the bracelet.  I was lucky to have some dry time between rain showers when I took these photos.  There are unexpected sprinkles throughout the afternoon and evening this time of the year in rim country.

I continued hiking around and found a beautiful view through some trees looking way far away.  The alligator juniper adds to the natural framing of this photo.  Really pretty!


Monday, July 7, 2014

Journey Notes Copper and Paracord Bracelets


I've been making some bracelets with a travel theme and they are like little journey notes.  I've got the letters in the middle and the year Arizona became a state.  There are so many places to visit in Arizona such as Havasupai Falls which is located at the bottom of the Grand Canyon, the Grand Canyon itself, Sedona and so many other wonderful places.

For example, I can customize these for a group of campers going on a special trip with dates, locations, names, etc.  I've made pieces in the past to commemorate a groups summit to Uhuru Peak on Mt. Kilimanjaro.  I could add trail names, GPS markers or camper names just to mention a few ideas.  I custom cut and make these, so I have some flexibility on size and how many characters of text can be put on them.

These are a perfect pairing with paracord bracelets for the adventure traveler at heart!  This is a great way to remember a favorite place you've visited, hiked, climbed, pitched a tent or even motored by.  It's the perfect utility art to wear because you could use the cord in a survival situation.  However, it may take you a while to figure out how to unknot it!

Arrowhead with Wolf Print Paracord Bracelet

Someone had seen photos of polymer clay beads I had made with an arrowhead and we got to talking about doing something in metal.  They liked the wolf prints as well and I told them I would think about it.  This thinking lead me to some sketching, then sawing and you know the rest of the story.

I have some impressed leaves on the background and you will see that I hammered some detail on the arrowhead, the paw prints were cut out and the piece was sweat soldered down.  I even got some little claw marks in the mix.  This bracelet is now somewhere out there in the Valley.

I have some other various themes I'm working through for more story bracelets.

Sunday, July 6, 2014

A Pleasant View

I'm not sure the sky today could have been prettier!    

Tuesday, June 10, 2014

The Aspen and Pendant


I went back to the woods over the weekend and decided to bring the pendant I recently finished and clicked some photos.  The leaf I used to create this pendant was picked up right by these trees, so I thought it would be fun to show them off.  There aren't too many where I hike, so it's a treat to see them.

I milled the metal, sawed out the leaf shape, domed, shaped it and folded the bail around the back and soldered it down.  I added the patina and lightly removed the excess.  This is something a little different from me, but I really like the look of the actual leaf shape.

Sunday, June 1, 2014

Sunset the other Night


Just too sweet to not share...

Tuesday, May 20, 2014

Half Ounce Silver Ingot and Paracord Bracelets


Here are a couple of bracelets I recently finished.  I milled the leaves on the front and back of each ingot.  I think the patina on the metal looks great with the black paracord.  The oak leaves were from the Tonto Rim area of Arizona.  This location was much referenced in Zane Grey novels.  The leaves were collected near the location of his original cabin.

Wednesday, May 14, 2014

Annie's Song

For my friends in Colorado!  :)  I believe this one is now in Boulder.

About Me

My photo
I enjoy silversmithing, making jewelry, beads and working with paracord. I sculpt in polymer clay and desert themes are my favorite. I'm always looking for ways to incorporate the beauty of nature into my work. My work has been published in a large book called "1000 Beads," Lark Jewelry and Beading, 2014. I have sold beads through the Glendale Bead Museum Shop, a gallery in Tucson and www.wearartbyjulie.etsy.com. I'm an artist currently showing my jewelry at the Shemer Art Center in Phoenix, AZ.