Sunday, October 26, 2014

Arrowhead and Pine Tree Pendants with Riveted Bales

I've been working through some different ideas recently.  I've wanted to make larger bales and rivet them to the pendants.  I'm continuing to experiment with different sizes of bales and they usually start out with a sketch, then I cut them out and fold them to get a good estimate of how they will look.  I then use the cut out as a template, draw around it directly onto my metal with a Sharpie and saw away.

The Sharpies are great and I have them in fine and thicker tips in various colors.  I have them everywhere...  On my table, in my bag, with my tools, tool box, on the counter... all over the place.  A Sharpie will create a block for your patina to take hold, so make sure you sand it off or use nail polish remover to get it off.  If you don't you will have black patina and then notice some red or an off color in your recessed areas.  Just make sure to get the pen marks off the metal before you patina.

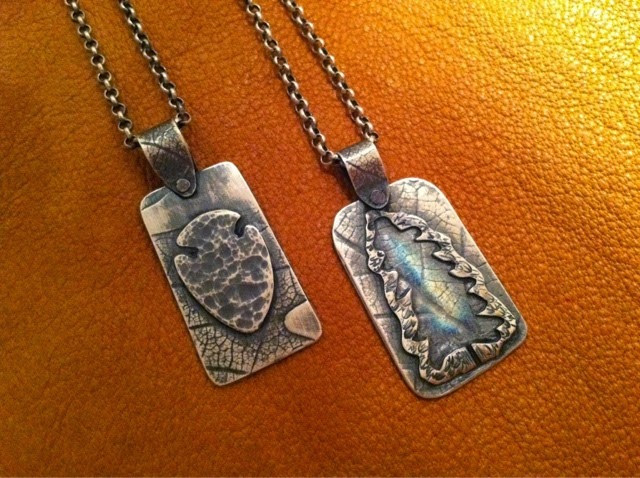
The handmade bales add some more interest to the pendants.  A jump ring or an oval jump ring are very basic.  I also milled the same texture to the bale metal as I used for the pendant backings.

You drill three holes and hope that somehow it will all match up with some adjusting and you then thread the right size silver wire through that matches the size of the drill bit used.  The fit for the wire to get through the metal needs to be very snug so the metal does not start to bend when hammering.  Hey, it still seemed to bend a bit, but it can be pushed back with some of the plastic type wire straightening pliers.  If you don't have those, it's always safe to use tools with a little masking tape wrapped around them so you won't scratch the metal.  Anyway,  hammer back and forth, flipping your piece back and forth and work at it slowly.

I also place a piece of index or heavy card stock under my metal to ensure I'm not scratching the reverse side of the pendant.  It's a trick to hang the bale off the edge of your little anvil because it's no longer flat.  Hanging it over the edge will make sure the large bale isn't an issue while your pendant lays flat.

I hammered the arrowhead to give it the look of flintknaping.  There are various types of hammers that will give your pieces added texture.  You just have to find the right one that works for your piece.

I added the patina and then removed it as usual.  I didn't want to leave a dark area in the center of the tree and removed some of it.  I then thought it was too light...  I then decided to add more patina with a Q-tip to the recessed area and it started to turn a blue/green.  Nice, I'll take it!  You never know what kinds of colors will appear.  I do know that if you have what I call the peacock colors and you add too much patina, it can turn brownish or just dark.  I wanted more green, but I stopped right there...  You have to be able to say this is good enough and stop.  It's not easy, but many times with the jewelry, to much of a good thing, is overdone and you can loose your look.  Let go of the perfection and say, "This will work!"

I really like the bales on these and they just look a bit more handmade.  The larger bale can easily accommodate a much heavier chain, larger clasps and thick rubber or leather cords as well.


In the Works Friday

I was going through some scrap silver for casting on Friday and found a piece where I had sawed out a pine tree.  I decided to then saw around that to create a silhouette.  I sweat soldered the piece down to another piece of metal.  As you can see the piece on the fire brick didn't look like much at that point. 

Let's see what else...  I have an arrowhead pendant in progress here, some bales I sawed out for the pendants, earrings pieces with clovers and another larger milled piece that will be a pendant.  I think I will drill some holes in that metal and build a frame around it.  Simple and it will be all about the leaf impression on that one.


Tuesday, October 21, 2014

Riveted Cross and Bale Sample in Copper

This is something I've wanted to make for a while.  I really like to rivet copper and do what is called a cold connection as you can see I've done for this pendant and bale.  The copper sheet for the pendant back and the bale were both milled at different times.  This is what I consider a sample to experiment with gauges of metal, size and spacing.

There are no instructions for these items, just what I see in my mind.  Sometimes I draw right on the copper with a fine tip Sharpie and saw out the piece.  Sometimes I draw onto a thick index card and experiment with pattern peices like I did with the bale.  The backing piece of copper was with my little pile of metal (yes, pile of metal that could have very easily made it's way to the recycling bin at the jewelry studio) and I figured how too make good use of it.  The bale piece was also a little piece of copper that had been bouncing around with my miscellaneous metal as well.

The metal has texture on both sides and the back of the pendant looks pretty much the same as far as the leaf patterns.  The rivets for the cross and bale can be seen from the back as well.  The leaf texture was a bit light on the bale and I hammer stamped some texture onto it just like I used on the cross.  You can take one detail from one area and add it to another area.  This gives a little bit of this here and a little bit of that there, to create a cohesive look.  Just little simple things you can add to tie the look together.  I also added some miscellaneous lines with a graver.

I will work a bit more on this design and would like to increase the size of the base metal.  I would like to have a little more space at the top, but I was using essentially a piece of my scrap copper, so I was limited on size.  I like the size of the bale because it can accommodate a thicker round leather cord or heavy chain.  I may just saw a piece a bit more narrow the next time.  I also have some other ideas for the connections that may involve some stones and beads.

I like to work on samples in copper before I make larger pieces in sterling silver.  I see some silver and gemstones with the next one like this.  To be honest, every time I make something, I learn something.  You go through the process and then ask yourself, what can I do differently?  Well, you pretty much know what works and what doesn't.  I got this one together just fine, but I've learned a bit more and the next one will be improved.  Always room to grow and learn!

Sunday, October 5, 2014

Quilted Heart

This pendant is made of fine silver, sterling silver and various gauges of silver wire.  I actually used one small fine silver ingot and milled it, annealed it, milled it more, then cut it into three pieces.  I have two other pendants in the works that will have fine silver backings.

I hand engraved and hammer stamped the designs on the backing piece as well as the heart.  For some reason, I decided to do a cold connection here and drilled holes through both pieces of metal and riveted.  I added accents to the rivet tops to match the images on the heart and backing.

The wire wrapping takes hours and hours and I actually made this one less complicated than some of my other past pendants.  The sterling beads were added as accents and they give the piece that little bit of something extra.

The chain is from the Czech Republic, the fine silver is from a U.S. mint, the silver sheet has been in my tool box for over 15 years, the wire was picked up in Phoenix and the yummy faceted rhodolite garnets were shipped in from Bangkok.  

Making jewelry is a little bit like making a quilt.  Always looking for something special here and something special there.  All the little pieces, that at the right time, come to be... little pieces created by me.


About Me

My photo
I enjoy silversmithing, making jewelry, beads and working with paracord. I sculpt in polymer clay and desert themes are my favorite. I'm always looking for ways to incorporate the beauty of nature into my work. My work has been published in a large book called "1000 Beads," Lark Jewelry and Beading, 2014. I have sold beads through the Glendale Bead Museum Shop, a gallery in Tucson and www.wearartbyjulie.etsy.com. I'm an artist currently showing my jewelry at the Shemer Art Center in Phoenix, AZ.